Sunday, August 23, 2009

Height Depth Compositing Part I

Here is Part I of the Height and Depth Compositing tutorial, it will go through the initial set p for rendering the pass in Maya. This will focus on just the height and depth passes, but the same method can be used for generating other custom passes.
I started with a simple scene that has several cylinders, a ground plane, and a background card, simulating a forest scene or something.

The difference with height and depth compositing versus standard depth compositing is for scenes that have a lot of tall objects that break the top of the frame, such as a foggy forest scene. If your scene has a low horizon or shows a lot of sky, then the effects of the height pass will not be too noticeable and a simple depth pass will work just fine. The method outlined here will work just fine for an anti-aliased depth pass. In the example here, we will also create an interactive light pass.
The first step is to create the shader. The basic principal here is that any image is made up of three channels, red, green, and blue, which are really 3 separate grayscale images combined to create the final image. In most cases, we focus on the result, but here, we need several different grayscale mattes, instead of rendering out multiple passes, we can render 3 in a single pass, using each channel as its own pass, we don't care about what they look like together, just what each component looks like.
For this example, the red channel will contain our interactive light pass, the green will contain the height information, and the blue channel will hold our depth pass. To get started, create a lambert shader and three ramps. Set the color of the lambert to black.
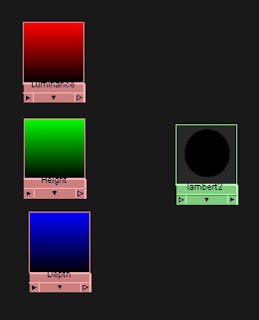
Set one ramp to go from black to red and name it Luminance, set another ramp from black to green and name it Height, and set the third ramp from black to blue and name it Depth. Be sure that all of the ramps are set to V Ramps.
Next create 4 locators, these will make it easier to set the bounds of the height and depth. They aren't necessary, but make it a lot easier to set up the height and depth. Name the locators Top, Bottom, Near, and Far.
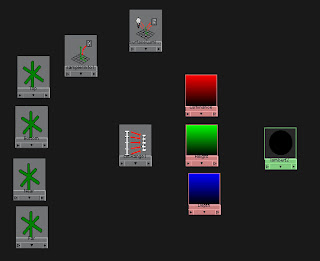
We will also need the following utilities, a sampler info node, surface luminance node, and a set range node.
Next we will set up the locators with the camera. First parent the Near and Far locators underneath the camera, then zero out the translation and rotation values on the locators. They should now be at the pivot point of the camera. The next thing to do is to point constrain the Top and Bottom locators to the Far locator. Be sure to only constrain the X and Z axes, so that they will always be above and below the far node, but they can be at any height.
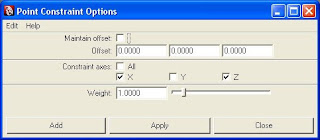
Maintain offset should be off. Lock the X and Y attributes from the Near and Far locators, and the X and Z attributes off of the Top and Bottom locators. Now the Near and Far should only be able to move to and from the camera, and the Top and Bottom up and down. We will use the Z values to determine the depth and the Y values to determine the height. We will take those values to drive the color of the ramps, we just need to remap to values to fit the 0 to 1 range.
Connect the translateY value of the Bottom locator to the oldMinY value of the setRange node. Then connect the translateY value of the Top to the oldMaxY.
For the depth, the important thing to remember is that the Z values are always negative in relationship to the camera, so the Far Z value will be a smaller number than the Near, so the Far should be mapped to the oldMinZ value and the Near to the oldMaxZ.
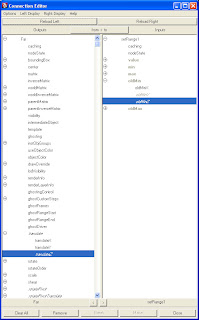
The Min and Max values should be 0 to 1, to remap them to the V range of the ramps. For the values, map the pointWorldY from the sampler info node to the valueY of the set range. Next, map the pointCameraZ of the sampler info node to the valueZ of the set range. Finally, map the outValue of the surface luminance node to the valueX of the set range.
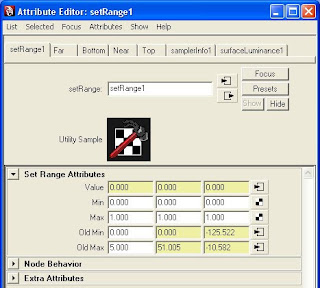
Now to connect the ramps, map the outValueX to the vCoord of the Luminance ramp, the outValueY to the vCoord of the Height ramp, and the outValueZ to the vCoord of the Depth ramp.
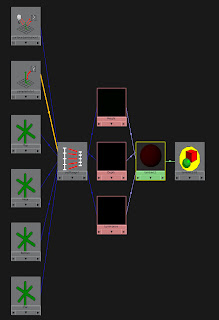
The final thing to do is to delete the 2dPlacementNodes of the three ramps. The oldMaxX value of the set range node is the cap for the surface luminance node. The surface luminance node measures surface brightness, but it is a float value that is higher than one.
In Part II, we will go over setting up the render and compositing the pass.

Monday, August 10, 2009

Height & Depth Compositing

I have had several requests over the past few months to go over how to do a fake fog pass using a height and depth pass in compositing, so I will put together a tutorial and post it here. I was working on a Macro for Digital Fusion, but I have run into several issues with dealing with curves, that I have to put it on hold for a little bit. For whatever reason, LUT aren't working properly from inside a macro. Anyway, I should have the tutorial posted here in a few days.

Sunday, August 2, 2009

Moving on to Kung Fu

With no new news regarding the Stereo 3D, I am moving on to my next topic, setting up my next production in Mental Ray, the Kung Fu Panda TV Series. While The Penguins of Madagascar has been quite successful, it was started a couple of years ago and was developed in Maya 8. Now it is in Maya 2008, after a brief stab at 8.5, but that was a painful upgrade, and it doesn't look like it will upgrade anytime soon, why fix it if in ain't broken! The Penguins of Madagascar is rendered completely in Maya Software, with baked Ambient Occlusion in the set, when we started, it was too costly to render in Mental Ray with live AO at our vendor studios. The characters all have fake AO shadows from a depth map shadow casting ambient dome, which brings its own issues. For Kung Fu Panda, we switched to 2009, to take advantage of the new Mental Ray integration and the updated nParticles system.
With 2009, and upgrades at our vendor studios, it is now possible for us to render completely in Mental Ray so we have made the change. With the advances in the technology, it is also faster for us to ray trace our shadows and use final gather than to use a separate AO pass. Yes I know it is not the same, but we were facing many issues with the AO pass and quality, and the Final Gather is giving us a better look by itself than with AO added. We ran into a limitation of the shader, that causes faceting for a nice smooth AO. I will post some examples later, it is from the spread being set too high, which we needed to get the look we wanted.

Friday, July 24, 2009

Anaglyph disappointment

We got back initial tests from Color Code and Trioscopics, to of the major anaglyph encoding companies with their own color schemes. Unfortunately, all of them still sowed the ghosting that I was seeing with my rough red-cyan anaglyph tests. We are asking them if there is anything they can do on their end to minimize the ghosting, but at this point it seems like it is just a part of anaglyph.
I am not sure if it is due to the quality of the gels or that the lighter color gels just can't get 100% saturation so the cannot block all of the other colors, practical vs theory. What I am seeing is part of the red image through the cyan gel, or with Trioscopics, part of the magenta through the green or blue through the yellow with color code. It is mostly around bright objects, or objects that are fairly desaturated, such as bright white and grays. I tried going into Fusion and adjusting the color filters for each eye, but I was unable to get a combination that would completely remove the ghosting, although I was able to minimize it in certain cases.
As far as color goes, both Trioscopics and Color Code did a good job of replicating the colors, Penguins I wasn't worried about too much, other than the black and whites, however Fanboy and Chum Chum held up pretty well. I think the hardest part for Fanboy was that all of the backgrounds where cyan and there was a lot of red as well, which caused many problems, however since neither Color Code nor Trioscopics used red-cyan, it wasn't as tough.
The biggest issue with Color Code I think was that with the Blue-Amber colors, there was such a vast difference in the brightness between the eyes, it was hard to visualize the stereo image as it was with Trioscopics, which is a much more even density. With Color Code, it a probably a stop or two difference between the left and right eyes, however with Trioscopics green-magenta, it feels pretty even.
In the end, I'd prefer to only do an anaglyph conversion with a black and white show or something with muted colors, but for broadcast, until there are enough 3D televisions purchased, it has to be anaglyph.

Saturday, July 4, 2009

Anaglyph Output Issues

After I finished compositing both eyes to send out for the various encodes that we wanted to test, TrioScopics and Color Code along with traditional anaglyph encode, to see which version works best with our shows, we were having a hard time being able to get it done in the timeframe we were looking for, especially with such a short amount of footage. Unfortunately we were unable to find a place to encode the anaglyph version and we were unable to get a color code version either, so I played around with doing my own Red-Cyan anaglyph encode in Digital Fusion. The process was fairly simple and straight forward, all that is needed is to filter the right eye with cyan and the left eye with red and combine them.
To do this I simply created a cyan background and multiplied it with the right eye image, created a red background and multiplied it with the left eye image and then screened the cyan left eye over the right. This gives the anaglyph image, which worked for the most part. There was a slight problem where I was getting a ghosting outline of the opposite eye. What this gave was an offset halo on either side of the 3D object.
At this point I have been unable to remove it completely, the cyan is not completely cutting out the red pass, which is causing the ghosting. It is most prominent with white objects or objects with a strong bias in the red. Maybe the other encodes will be able to reduce it.

Sunday, June 28, 2009

Stereoscopic production

I am currently working on a couple of stereoscopic tests for work. While I have found bits of information on various websites, I thought I'd compile all of the various information that I come across or discover and post it here. While I have some stereoscopic experience, I don't by any means claim to be an authority on the subject. Feel free to post an questions or corrections if you disagree with anything I have said. While there are many different approaches that can be taken when creating stereoscopic productions, unfortunately I am dealing with the confines and restrictions of broadcast television, which currently, that means anaglyph images.

Sunday, June 21, 2009

Finally...

Well I finally got around to starting my 3D blog where I will collect my thoughts on the industry and software.  I currently work as the Lighting and Compositing Supervisor for the CG department at Nickelodeon, working on developing a series based on Kung Fu Panda along with another pilot.